BigQuery Terms
Before starting with any implementation, some basic terms used in BigQuery, need to be clarified.
Datasets
In BigQuery, you have entities called datasets. A dataset is nothing more than a container on the top-level of your project used to organize and control access to your tables and views. Thus, a table has to have a dataset it belongs to, so before building your first table, you first have to create a dataset.
When getting started, it’s OK to see datasets as a simple grouping mechanism, even though under the hood, it is, of course, a bit more.
Tables and table schemas
Google BigQuery is a relational database and uses a table structure to organize individual records in rows, while each record consists of columns that are also called fields.
Also, typical for RDBMS, Google defines BigQuery tables by a table schema composed of the columns and their definition. A table’s schema can either be applied at table creation or auto-detected by BigQuery when the first set of data populates the table, even though I would always recommend defining the schema before-hand.
If you have experience using SQL-based RDBMS, you will quickly get into BigQuery.
Columns
BigQuery defines the columns/fields of a table schema via four different properties.
Column name
The column name has to be a case-insensitive alphanumerical string with a maximum of 128 characters. Underscores are also allowed, and the name has to start with either a letter or underscore.
Even though there are three names columns are not allowed to have:
- _TABLE_
- _FILE_
- _PARTITION
Column description
The column description is an optional string describing the column with a maximum of 1,024 characters.
Type
The type is a mandatory field describing the data type of the column. Possible values are, e.g.:
- INT64
- FLOAT64
- BOOL
- STRING
You can find a list of all possible values in the official BigQuery docs.
Modes
Each column also can have a so-called optional mode. The mode of a column can be one of three possible values.
- Nullable — NULL values are allowed (default)
- Required — NULL values are not allowed
Repeated — The field contains an array of values of the specified data type instead of a single value.
Hands-on BigQuery
After defining the absolute basics one should know before getting started with BigQuery, we will now set up a small BigQuery project using Node.js. Since this is an article using Node.js, I expect that Node.js and NPM are available on the readers’ machine.
Setup of a clean Node.js project using BigQuery
- First, we have to create a new NPM module using npm init.
- Second, we have to install the BigQuery NPM module using npm i –save @google-cloud/bigquery.
- Finally, we need to create a new JavaScript file to put our code into → touch index.js.
GCP service account
Regardless of application size, I always recommend creating an extra service account via GCP IAM to ensure security and correct permissions are in place, regardless of who runs the application. How to create an additional service account in detail is outside the scope of this article but can be simplified in a few easy steps:
- On GCP: Go to “IAM & Admin” → Service Accounts → Create Service Account
- Create a new account and select the appropriate role, e.g., for this article: BigQuery Data Editor + BigQuery User
- Select the created service account → Keys → Add Key → Create New Key → Key Type JSON → Download the key
Make sure to add the key file to your just created Node.js project. Just be aware that you should never commit these critical files to Git! If you want to know how to store your secrets in Git securely, you can check out one of my other articles on medium:
Creating datasets and tables via code
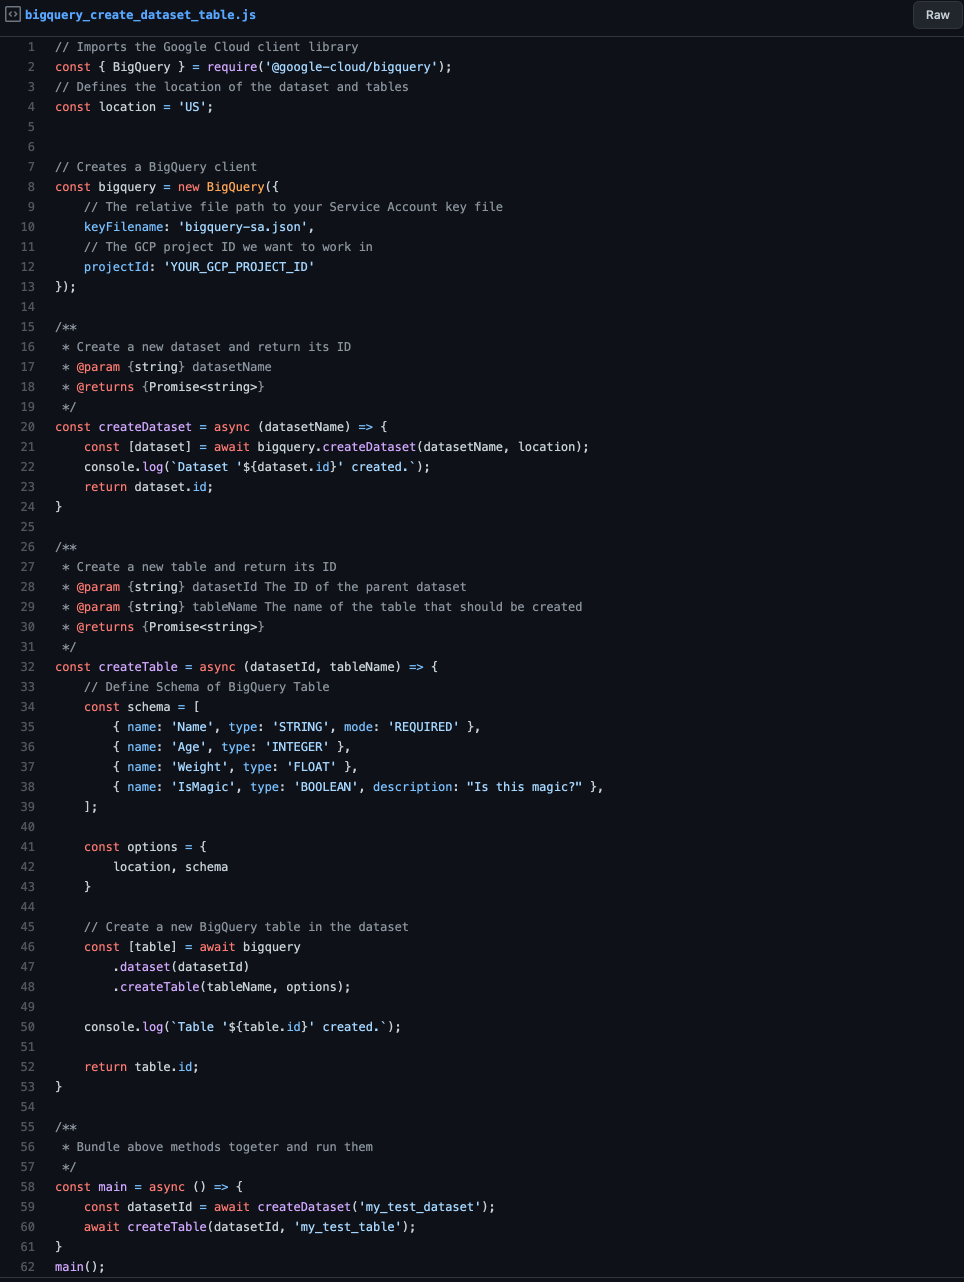
Now let’s get to the actual code and create a dataset, a table, and a schema to insert our data.
bigquery create dataset table
Even though the above script should be straightforward, let’s go quickly over it:
- First, create a new BigQuery client. Make sure to replace its parameter values with your specific ones. e.g., your GCP project should be something different than mine.
- Second, construct a simple wrapper method for creating a new dataset on BigQuery, taking a dataset name as an input parameter and returning the created dataset’s ID.
- Third, creating a new table by its name and the dataset ID, the table should be attached to and returning the table ID.
- Afterward, we define the main method that bundles together the create dataset and table method calls.
When you run the script, the program should print out the following to the console:
- Dataset ‘my_test_dataset’ created.
- Table ‘my_test_table’ created.
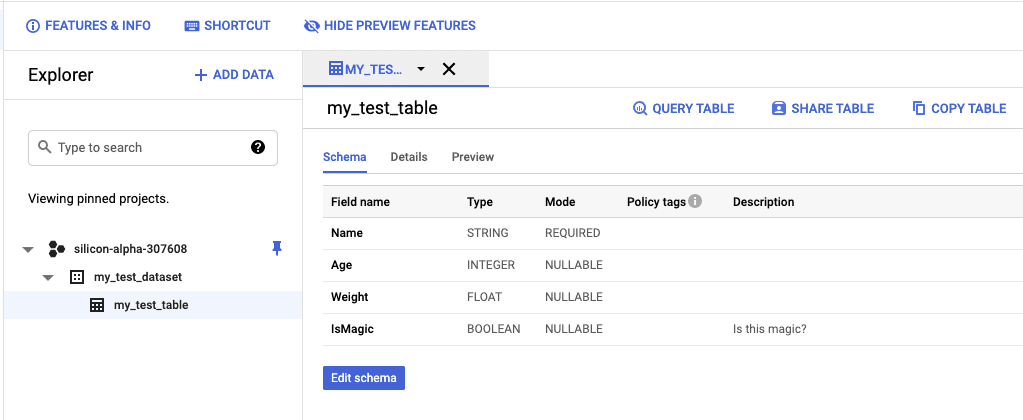
You should also verify the result by checking BigQuery in the GCP console. As you can see in the following image, the application created the dataset and table with the above schema in the demo project silicon-alpha-307608.
GCP_BIGQUERY
IMPORTANT️
After creating a new table in BigQuery, BigQuery typically takes 1–2 minutes for the table to be ready. So it would be best if you don’t create a table and immediately afterward stream data into it to prevent errors.
Streaming data into a BigQuery table
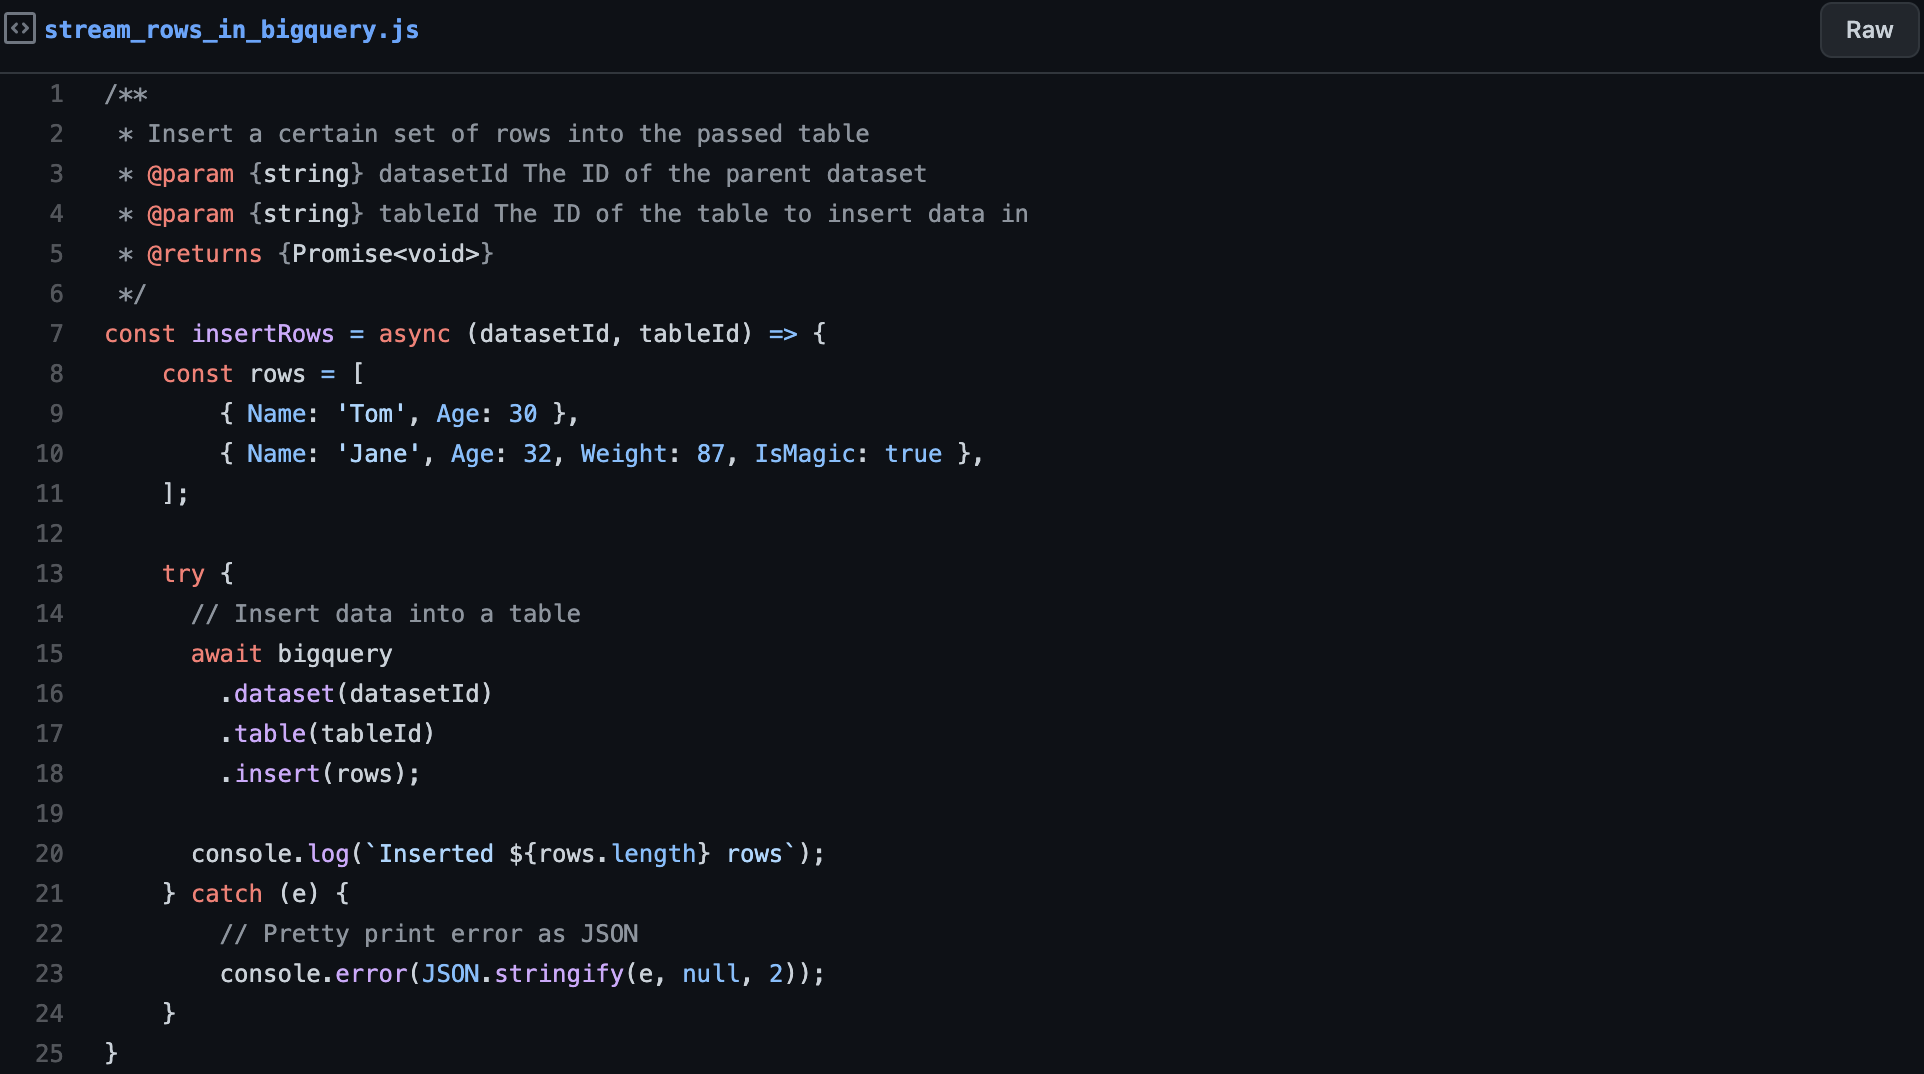
The streaming of data into a BigQuery table is pretty easy, and you can see an example in the following snippet. You have to make sure that the service account you use owns the “BigQuery User” role or something superior otherwise, it will throw an error due to missing permissions.
stream rows in bigquery
Inserting the data into a BigQuery table is as simple as it could get:
- First, define the rows you want to insert. Make sure that the rows are matching the defined table schema. Otherwise, it will throw an error.
- Second, tell BigQuery that you want to insert the rows into the table under the corresponding dataset.
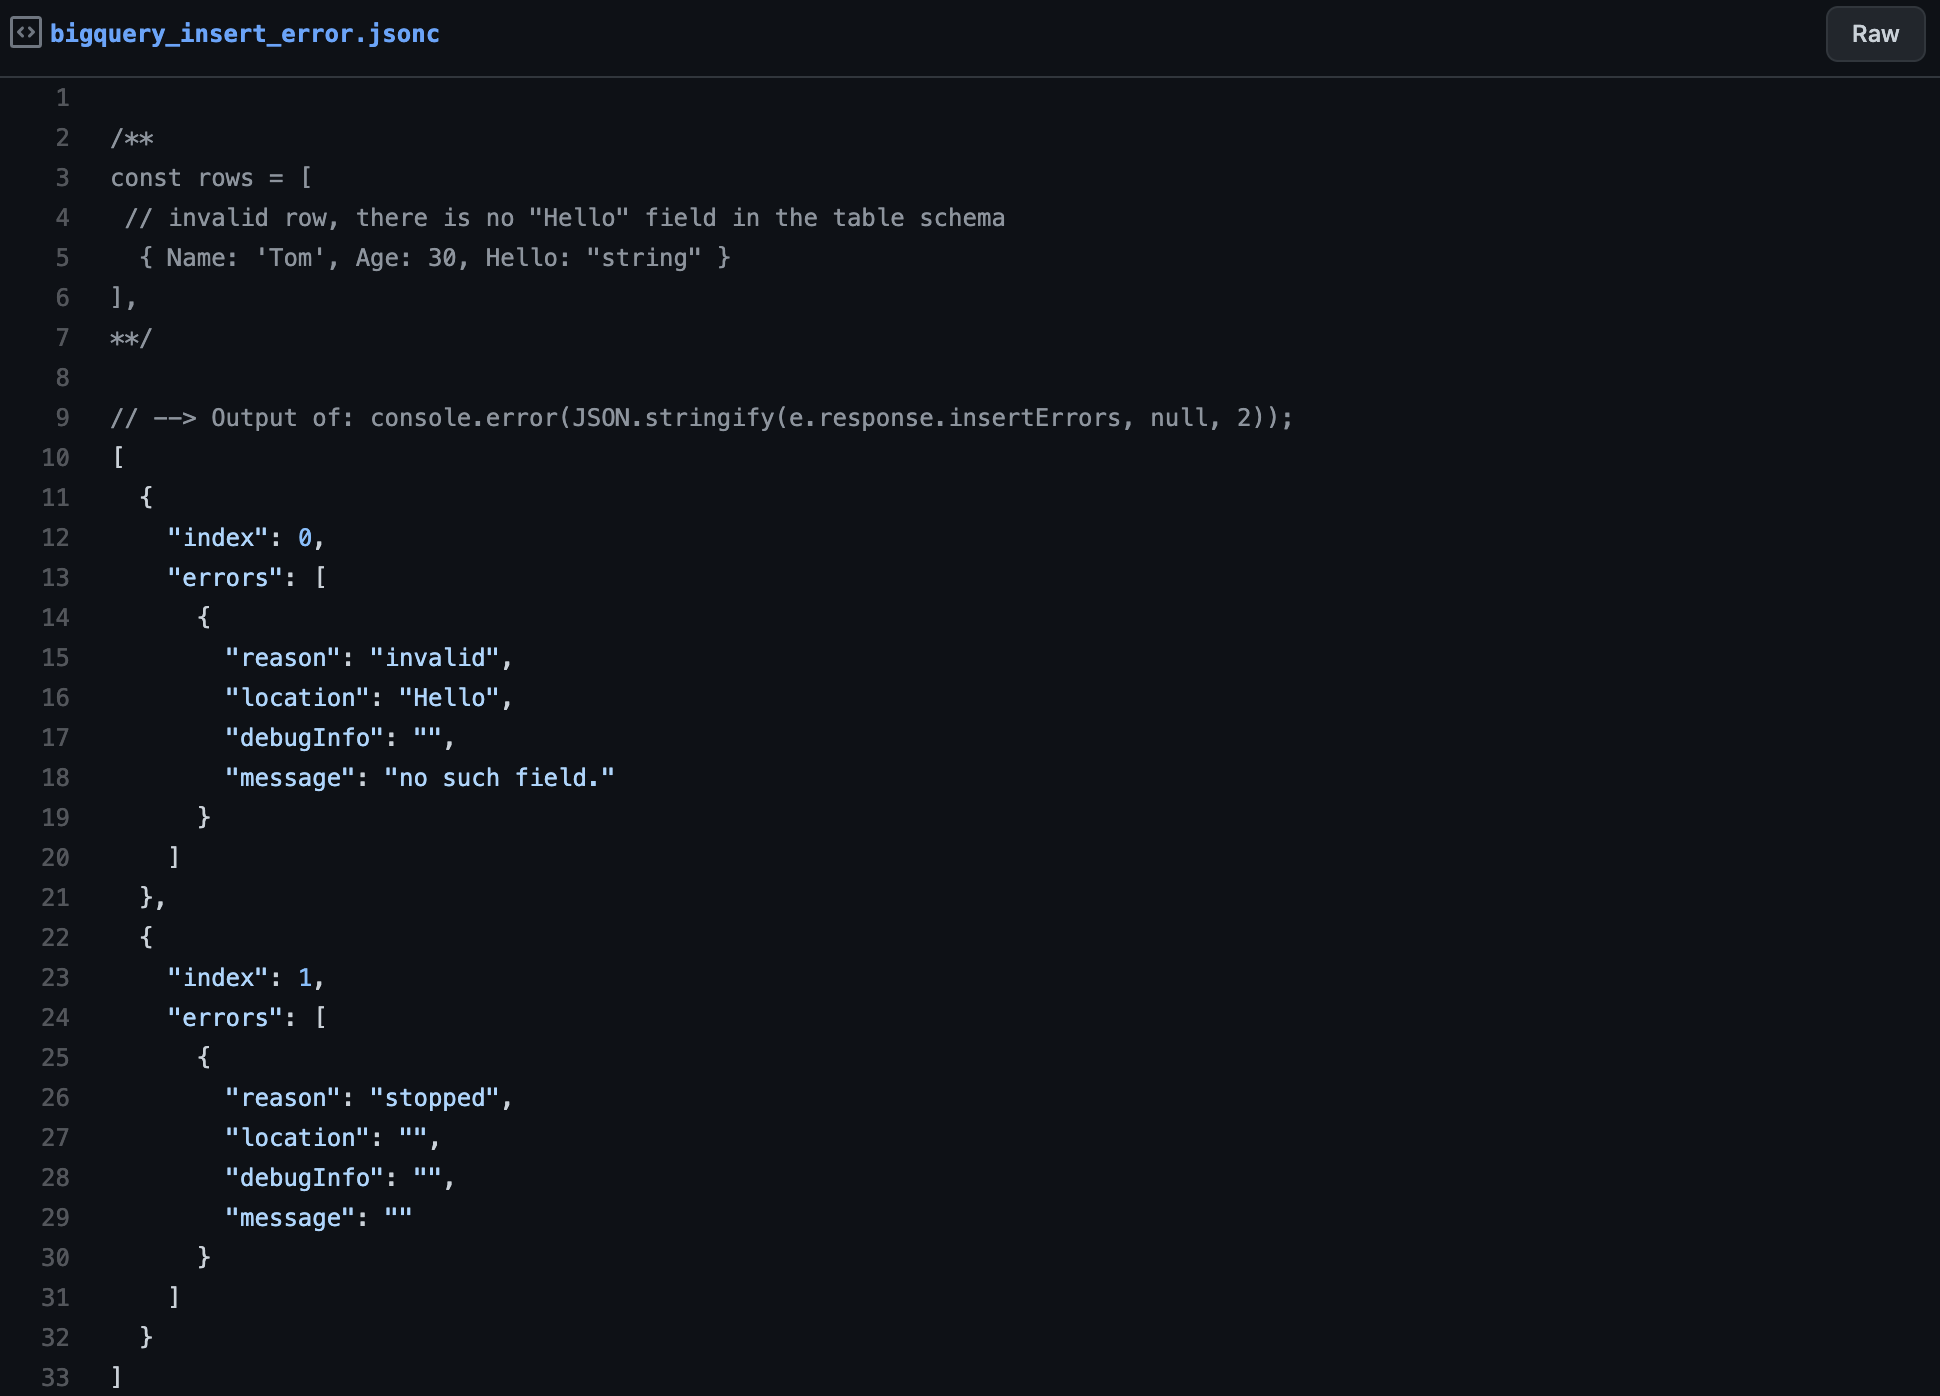
In the case that you try to insert an invalid row, it will throw an error like the one in the following snippet, where it tells says that the field Hello does not exist.
bigquery insert error
Query data from BigQuery
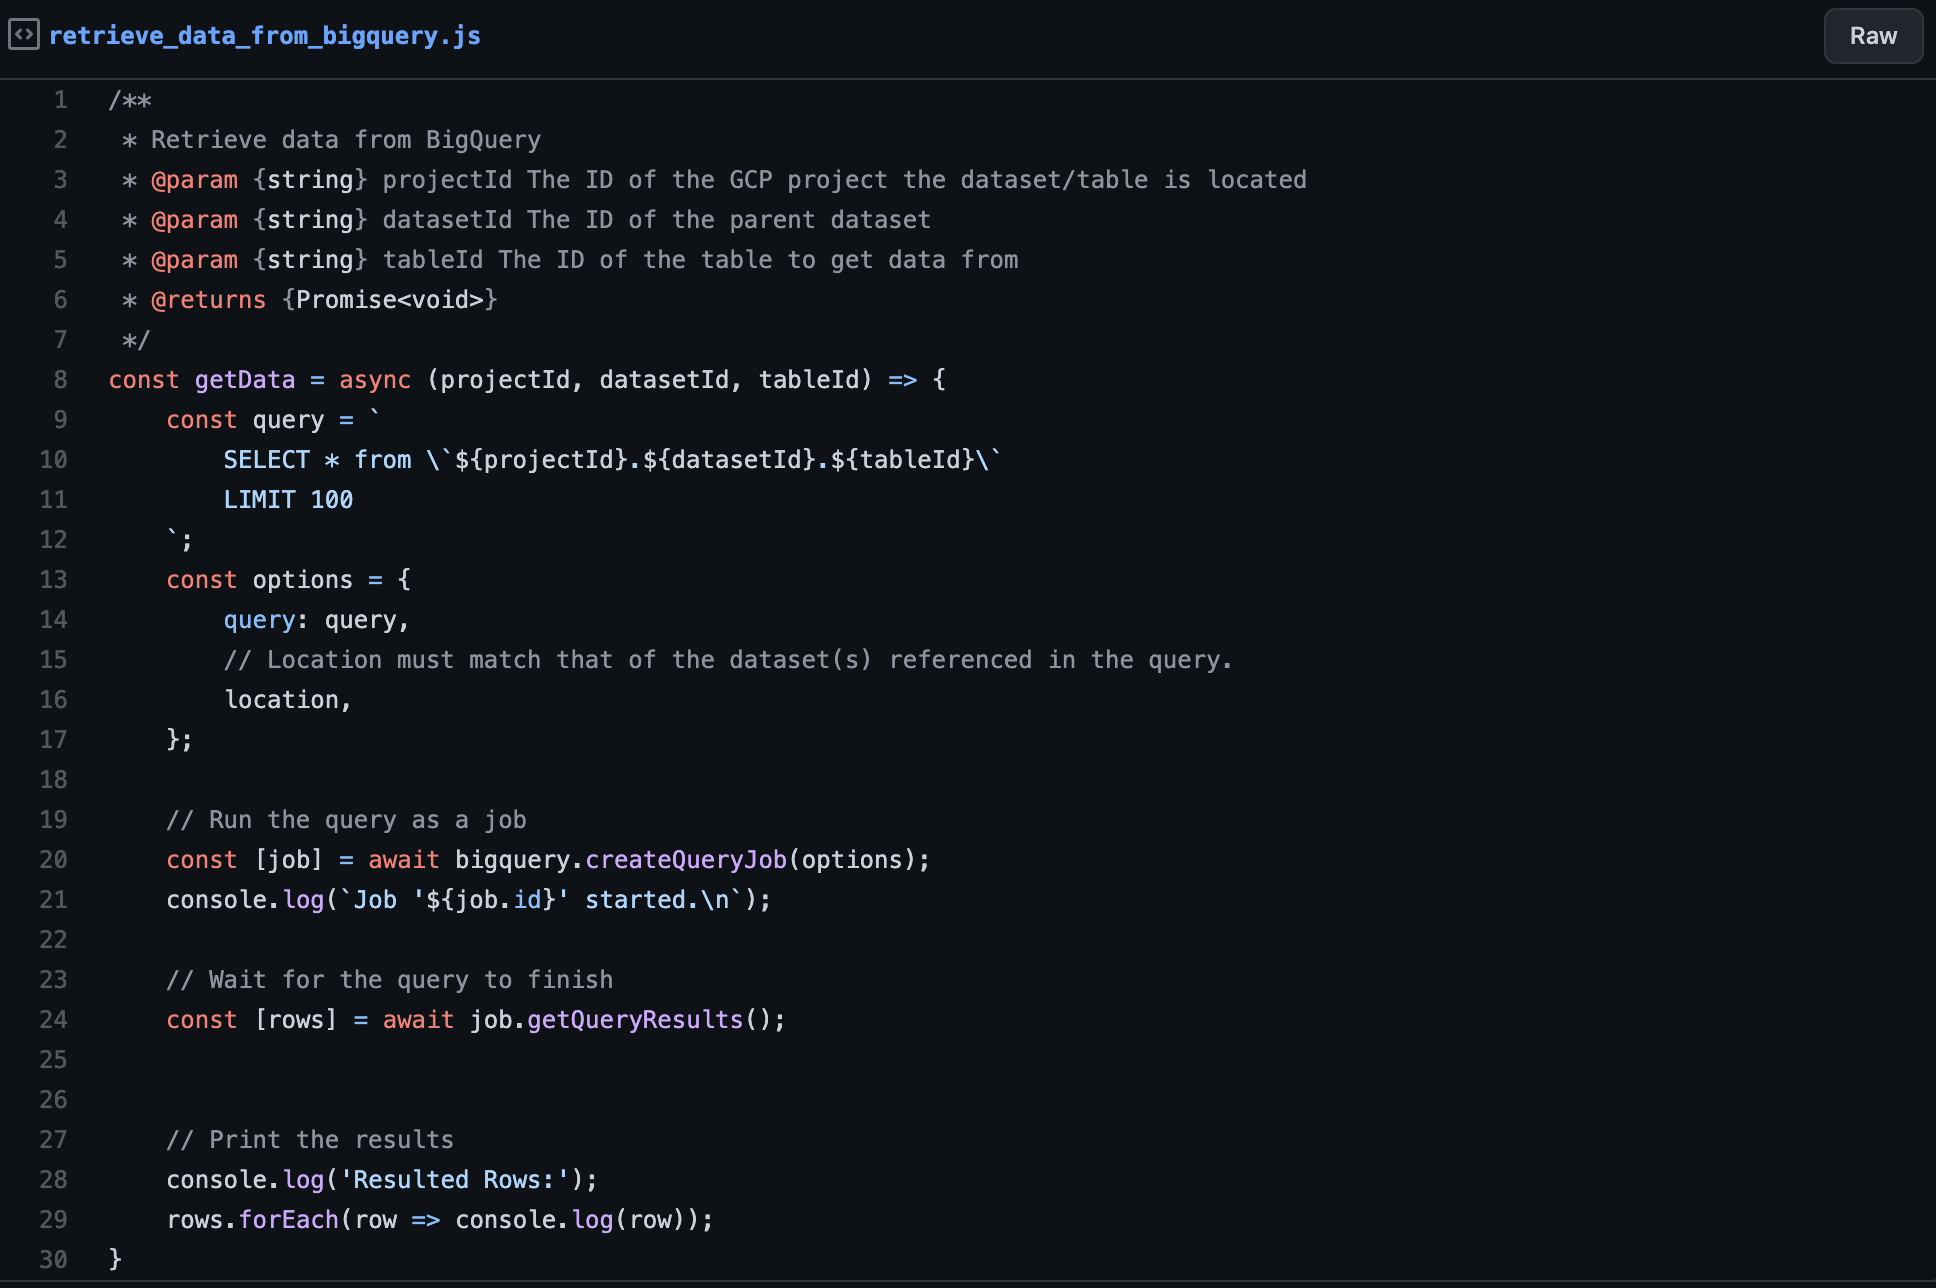
Requesting data from BigQuery is almost as easy as inserting data, even though a bit different. Similar to inserting data, we also need the “BigQuery User” role for retrieving data.
retrieve data from bigquery
Retrieving data from BigQuery can be summarized in three easy steps:
- First, create the SQL query that defines the selected fields, the number of rows to retrieve, etc.
- Second, create and trigger a query job that runs the provided query asynchronously in the background.
- Third, take the returned job object from the second step and wait for the query results.
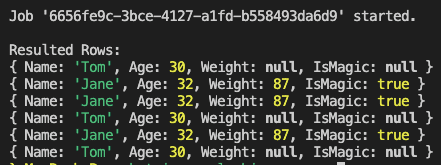
In the following image, you can see the console output of running the getData() method from above after running the previous insertion script three times before.
CONSOLE_OUTPUT
Reviewing the above three steps, you might ask, “Why don’t I already receive the query results in the second step and have to make an additional request for getting it explicitly?”. Good question. We will provide the answer for this in the next section.
BigQuery jobs
Jobs in BigQuery are similar to jobs in other technologies. In simple terms, jobs are asynchronous actions that are created and afterward scheduled and run automatically by BigQuery.
Queries, in general, needs to be executed via a job. That is because jobs can take a very long time to complete, and you don’t want to have your application blocked for several hours.
So the usual case for long-running queries is to create the corresponding job and poll it from time to time to check its status. Since inserting data is no long-running job, insertions can run directly without creating a job.
We awaited the job in the above query because we knew it would not take long. But primarily, when you use BigQuery for BigData analytics and query several TB or PB of data, it should be considered using some non-blocking approach.
BigQuery job status
A job in BigQuery can be in one of three different states:
PENDING: The job is scheduled but hasn’t started yet
RUNNING: The job is currently in progress
DONE: The job has finished. Even though BigQuery reports the DONE state as SUCCESS or FAILURE, it depends on possible errors.
Due to the above states, it is, of course, also possible to cancel already running jobs. That is especially useful if you accidentally triggered a long-running job or if a job is taking way longer than expected and you want to stop it to prevent too many costs.

In the following articles, we will learn what partitioned tables in BigQuery are and how to use them to improve your table performance and costs.
Author
Pascal Zwikirsch
Pascal Zwikirsch is a Technical Team Lead at Usercentrics. He manages a cross-functional team of several frontend and backend developers while providing a seamless connection between the technical world and the product managers and stakeholders.
Pascal was a former frontend developer for several years and now specializes in backend services, cloud architectures, and DevOps principles. He experienced both worlds in detail. This experience and the collaboration with product managers made him capable of constructing full-fledged scalable software.
Besides his job as a Team Lead of the B2B developer team, he likes to share his in-depth knowledge and insights in articles he creates as an independent technical writer.
For more content, follow me on LinkedIn
